
When I'm not papercrafting, I have a tailoring business and I teaching
Fashion at the High School level. Kate from i {heart} papers saw these 2 cute DIY messenger bag kits
from My Mind's Eye at CHA Winter 2012 and facetimed me to show them to me. I thought they
looked adorable, and once they were in stock I got one to see what they
were really like. To even up the playing field, I asked my 15 year old
daughter, Hannah, to sew the bag without help from me to get a real feel
for the ease of the kit. Here's what we saw, what she did, and her
thoughts on this project.


We opened the kit, and the first thing we noticed was that all the bag parts were clearly marked and at first glance, it looked like everything would accurately fit together. Hannah hadn't seen fabric printed like this before and the first thing she said was, "It's like cheating!!" Hannah traced the bag pieces because if this went together as easily as it looked like it might, I wanted to use this bag in my classroom. Hannah both traced the pieces and wrote down the bag measurements, in case the paper pieces we made go missing.
It took Hannah 30 minutes to cut the pieces and approximately 2 hours to sew the bag. She strongly recommends thoroughly reading and understanding the instructions before beginning. I'll let you in on a little secret later in this blog post. Also, if you are able to, go get interfacing to make this bag a little less floppy. That was one thing Hannah noticed right away and she thinks this bag would be even easier to assemble if it were all interfaced.
While the fabric was labelled with the plaid to be the outside fabric, the polka dotted fabric is very cute too, and could easily be switched depending on personal preference. Here's her finished bag;

Hannah said she really liked the length of the strap.

Hannah zigzagged around the edges of the fabric portion of this floral embellishment. The crocheted flower and button were included in the kit.

Hannah didn't like the size of the pocket, and that really is a matter of personal taste.

She liked the bag so much, she made a second one out of similar weight fabric. You will note the green plaid bag is slightly larger that the original kit bag. Hannah's recommendation - carefully read the instructions because they recommend a seam allowance of 1/4" and Hannah constructed some of the first bag using 5/8" seam allowance which is the standard seam allowance for clothing. Then, she realized her error and started assembling at 1/4" and that got her in a whole mess of trouble because she had also serged a seam. She learned all about exponential reduction with this bag. The original bag turned out well though, and is being used by Morgan as a cute lunch bag.

Hannah really loves her green bag and she convinced my 11 year old daughter to cut out one of these bags, and they'll construct it together on the weekend.
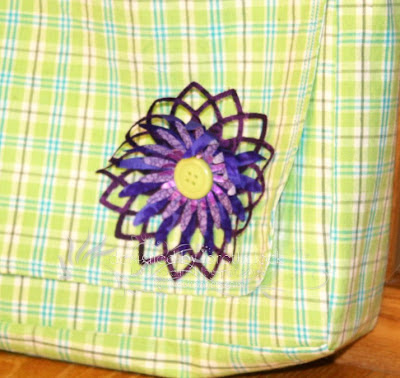
Hannah raided my quilt fabric stash to find all these purple fabrics for her flower. I don't know which Spellbinders dies she used, except for the Lotus Blossom die for the largest layer. She glued them all together and sewed a pin on the back of the flower so it can be removed when she launders her bag - very clever! Cute button she found, and I don't know where that was from either. She really had fun raiding my studio!

She made the inside of her bag a little differently. I'm not sure what she did to make the pocket so she was happy with it, but she made a tab and attached a button so it would be a little more secure.
If Hannah and my 11 year old daughter can put this bag together, I suspect anyone can. I recommend, as I do with all my students, go slow! Read carefully! Ask when uncertain! And ENJOY!!


We opened the kit, and the first thing we noticed was that all the bag parts were clearly marked and at first glance, it looked like everything would accurately fit together. Hannah hadn't seen fabric printed like this before and the first thing she said was, "It's like cheating!!" Hannah traced the bag pieces because if this went together as easily as it looked like it might, I wanted to use this bag in my classroom. Hannah both traced the pieces and wrote down the bag measurements, in case the paper pieces we made go missing.
It took Hannah 30 minutes to cut the pieces and approximately 2 hours to sew the bag. She strongly recommends thoroughly reading and understanding the instructions before beginning. I'll let you in on a little secret later in this blog post. Also, if you are able to, go get interfacing to make this bag a little less floppy. That was one thing Hannah noticed right away and she thinks this bag would be even easier to assemble if it were all interfaced.
While the fabric was labelled with the plaid to be the outside fabric, the polka dotted fabric is very cute too, and could easily be switched depending on personal preference. Here's her finished bag;

Hannah said she really liked the length of the strap.

Hannah zigzagged around the edges of the fabric portion of this floral embellishment. The crocheted flower and button were included in the kit.


She liked the bag so much, she made a second one out of similar weight fabric. You will note the green plaid bag is slightly larger that the original kit bag. Hannah's recommendation - carefully read the instructions because they recommend a seam allowance of 1/4" and Hannah constructed some of the first bag using 5/8" seam allowance which is the standard seam allowance for clothing. Then, she realized her error and started assembling at 1/4" and that got her in a whole mess of trouble because she had also serged a seam. She learned all about exponential reduction with this bag. The original bag turned out well though, and is being used by Morgan as a cute lunch bag.

Hannah really loves her green bag and she convinced my 11 year old daughter to cut out one of these bags, and they'll construct it together on the weekend.


She made the inside of her bag a little differently. I'm not sure what she did to make the pocket so she was happy with it, but she made a tab and attached a button so it would be a little more secure.
If Hannah and my 11 year old daughter can put this bag together, I suspect anyone can. I recommend, as I do with all my students, go slow! Read carefully! Ask when uncertain! And ENJOY!!
5 comments:
How fun! I love to sew also, but my time is limited. This looks like a great project that does not take a lot of time. I will have to grab one to create! Thanks for sharing this.
Hugs,
Lisa :)
The bags look great! Neat project offered by My Mind's Eye. I really like Hannah's bag, mainly for the colour choice and her funky flower embellishment.
Your daughter is very talented! These are adorable bags! Hope my daughter will learn the patience to sew when she is that age. Thank you for the post!
That totally is cheating!!
I was looking at one of these kits at Hancock fabric and I have to say on the one hand I'm a bit disappointed. But on the other, I'm glad I found your post as I will definitely know to interface it first. And then as your daughter did, trace all the pieces for perhaps using later on with a heavier weight fabric as well.
Thanks for your review! Although, I'm still not sure whether to buy it or not. LOL. :)
I ended up buying it!! ;) Found it on sale and bought the one with the bird on it.
It's very cute, but that fabric is totally floppy. That's not what I would choose to make a bag. (shrug)
Ah well. I'll have to go and find some interfacing!
Thanks again for the review. I've "pinned" you. I hope you don't mind.
(Sorry, I don't have any of those accounts. Will have to sign up for one!)
Post a Comment