
Happy Wednesday! For my project today I used Cheery Cardinal from Heartfelt Creations for the main image. I did a little research to see what cardinals really, really look like and I found this photograph;

I love the way this little guy glows. I didn't know that cardinal's backs and tails are darker than their bellies. I also didn't know that it's the male cardinals that are red and showy - the females are brown and yellow. I'll be colouring a male and female pair for my project next week, so stay tuned for that! I think it'll be lovely.

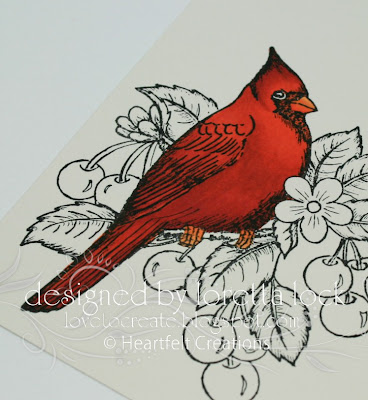
My project took a lot of time and I won't sugar coat it. This image really should be framed! It is quite heavy and is far too thick to be mailed normally because I'm not sure the layers would survive well. It might be okay with a padded envelope, but I'd be crazy nervous about it. For the first time ever, here's how I coloured it;

I started by stamping my image on ivory cardstock in black soot distress ink. While I was laying on the colour, the ink smeared but I knew it would be camouflaged in the ink so it wasn't a big deal for me. I would recommend heat setting the ink, using embossing powder or using Memento ink which the ink recommended by Copic International. I started with YR68;

I started shading with R08;

Followed by R27;

And finally, R29;
I shaded the back and tail of the cardinal using neutral greys;

I likely used too many reds for the cherries, but I like the rich colour gradation I achieved;

First, I used R35 over the entire cherry, using the drawn highlights for my lighting cues;

Next, R37;

Then, R46 followed by R39;


And finally, R89;

The last step to colouring with Copic markers is to reverse the colour order to blend each colour into the one lighter to achieve a smoothly shaded cherry;

Here's a close up of the finished image;

I stamped this image 4 times, coloured each as shown above and cut out the image elements. I used the Cardinal Family Die to cut out the cardinals and the blossom fits the Post Patch Die and if more blossoms are appealing, this coordinates with Posy Patch Flowers.
Once I re-assembled the image, it was very thick;

Since I had already put the work into the card front, I decided it would be DIVINE to doll up the inside of the card as well;

I used a sentiment from Lucious Cherry Swirl for the inside and this also gave me the opportunity to use some of the scraps that were lying next to my work space all handy and pre-cut.

This isn't a record for the most copics used in one of my projects, and considering the size of the image, I'm quite pleased with myself that I kept the number to what fit in one container!
beak; YR12, YR15, YR16
body; YR68, R08, R27, R29, N1, N3, N5
foliage; YG11, YG17, YG25, YG67, E33, E37, E39
flowers; R01, R21, colourless blender
cherries; R35, R37, R39, R46, R89
background; B0000, B00, B01, B12, B14
I have measurements and instructions on the Heartfelt Creations blog for my project and the rest of the design team has some amazing projects posted there as well. Enjoy!!
stamps; cheery cardinal, luscious cherry swirl (heartfelt creations)
paper; fashionista (graphic45), leapfrog, walnut creme (bazzill), jenny bowlin (coredinations)
ink; black soot distress ink (ranger)
accessories; twill ribbon (unknown), ric rac scallop border, large & small square nestabilities (spellbinders), cardinal family die (heartfelt creations), glue pen (sakura), christmas red glitter (art institute glitter)
tip top tuesday #13 - square
totally gorjuss #77 - bling it on
incy wincy #91 - buttons & bows
stamptacular sunday #108 - pile it on (I have 15 layers at the deepest point!)
shelly's images - show us what you got
delicious doodles #22- anything goes
TCP tuesday #156 - inspiration challenge
Moxy Fab - polka dot hullabaloo
my time to craft - perfect pets
stamp something - flowers, buttons, sparkle

I love the way this little guy glows. I didn't know that cardinal's backs and tails are darker than their bellies. I also didn't know that it's the male cardinals that are red and showy - the females are brown and yellow. I'll be colouring a male and female pair for my project next week, so stay tuned for that! I think it'll be lovely.

My project took a lot of time and I won't sugar coat it. This image really should be framed! It is quite heavy and is far too thick to be mailed normally because I'm not sure the layers would survive well. It might be okay with a padded envelope, but I'd be crazy nervous about it. For the first time ever, here's how I coloured it;

I started by stamping my image on ivory cardstock in black soot distress ink. While I was laying on the colour, the ink smeared but I knew it would be camouflaged in the ink so it wasn't a big deal for me. I would recommend heat setting the ink, using embossing powder or using Memento ink which the ink recommended by Copic International. I started with YR68;

I started shading with R08;

Followed by R27;

And finally, R29;

I shaded the back and tail of the cardinal using neutral greys;

I likely used too many reds for the cherries, but I like the rich colour gradation I achieved;

First, I used R35 over the entire cherry, using the drawn highlights for my lighting cues;

Next, R37;

Then, R46 followed by R39;


And finally, R89;

The last step to colouring with Copic markers is to reverse the colour order to blend each colour into the one lighter to achieve a smoothly shaded cherry;

Here's a close up of the finished image;
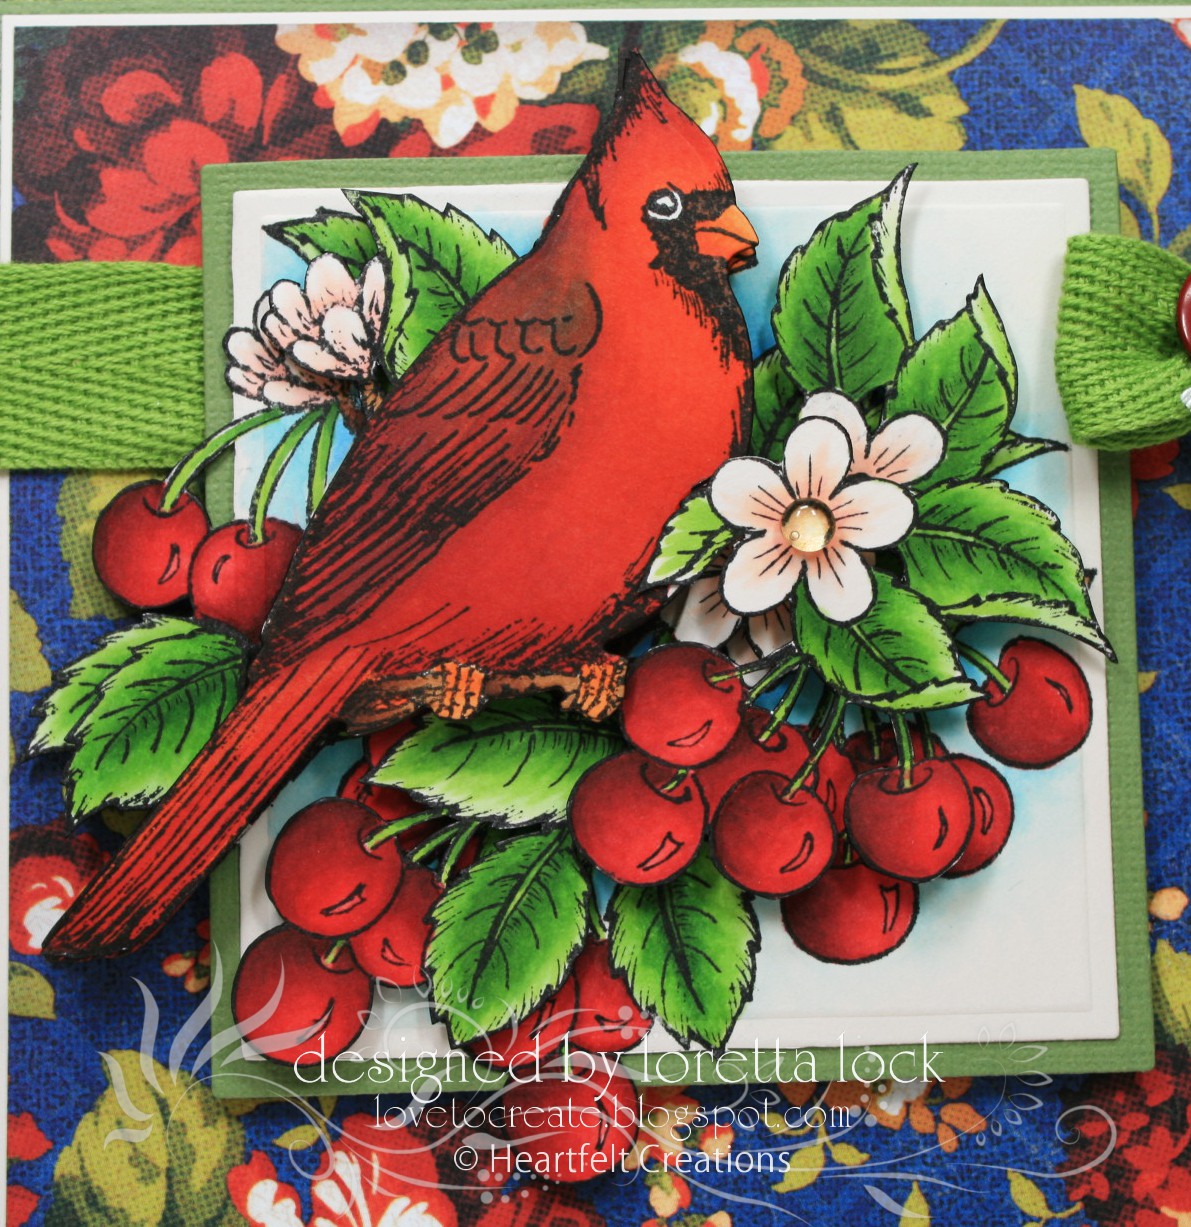
I stamped this image 4 times, coloured each as shown above and cut out the image elements. I used the Cardinal Family Die to cut out the cardinals and the blossom fits the Post Patch Die and if more blossoms are appealing, this coordinates with Posy Patch Flowers.
Once I re-assembled the image, it was very thick;

Since I had already put the work into the card front, I decided it would be DIVINE to doll up the inside of the card as well;

I used a sentiment from Lucious Cherry Swirl for the inside and this also gave me the opportunity to use some of the scraps that were lying next to my work space all handy and pre-cut.

This isn't a record for the most copics used in one of my projects, and considering the size of the image, I'm quite pleased with myself that I kept the number to what fit in one container!
beak; YR12, YR15, YR16
body; YR68, R08, R27, R29, N1, N3, N5
foliage; YG11, YG17, YG25, YG67, E33, E37, E39
flowers; R01, R21, colourless blender
cherries; R35, R37, R39, R46, R89
background; B0000, B00, B01, B12, B14
I have measurements and instructions on the Heartfelt Creations blog for my project and the rest of the design team has some amazing projects posted there as well. Enjoy!!
stamps; cheery cardinal, luscious cherry swirl (heartfelt creations)
paper; fashionista (graphic45), leapfrog, walnut creme (bazzill), jenny bowlin (coredinations)
ink; black soot distress ink (ranger)
accessories; twill ribbon (unknown), ric rac scallop border, large & small square nestabilities (spellbinders), cardinal family die (heartfelt creations), glue pen (sakura), christmas red glitter (art institute glitter)
tip top tuesday #13 - square
totally gorjuss #77 - bling it on
incy wincy #91 - buttons & bows
stamptacular sunday #108 - pile it on (I have 15 layers at the deepest point!)
shelly's images - show us what you got
delicious doodles #22- anything goes
TCP tuesday #156 - inspiration challenge
Moxy Fab - polka dot hullabaloo
my time to craft - perfect pets
stamp something - flowers, buttons, sparkle
27 comments:
Loretta,
WOW, WOW, WOW! This is the most gorgeous coloring ever! I just love how rich your image looks - I could drown in it! All the layers are just fantastic and I can tell this took quite a bit of time - I love this card!
Hugs,
Marsha
Wow, this is beautiful! You captured the colors so beautifully! We see them a lot where we live. I love their pop of red when they're in a tree. Your card is so pretty and thank you for sharing how you colored.
Have a great day!
Gorgeous, so rich and real life like!!!
I see cardinals every day here. We even have some young ones just hatched this Spring but I just couldn't get the shading right. By showing this tutorial you have helped me tremendously. I've never had a class for the copics so I'm pretty much hit and miss!
Your coloring is wonderful and the card is so beautiful!
Beautiful card - FAB coloring and dimension!
Absolutely STUNNING, gorgeous coloring and all that layering is the perfect touch.
OMGosh, Loretta! This is astoundingly gorgeous! It certainly should be framed - a true work of art! Exquisite coloring and incredible dimension! I love it!
Oh MY!! Fabulous colouring! Wonderful tutorial! Love watching your process! Loving all the layers!
Absolutely amazing! Your attention to detail really shows in the beautiful result. And your instructions for coloring are really great.
WOW! That's one amazing piece of art, Loretta!
This is amazing! I love red anyway and you sure made that little guy SHINE!
Very, very beautiful card. Thank you for taking the time to explain how you colored your project.
Loretta, this is amazing. Wow!!! The layers are fabulous. Thanks for the tutorial.
Gorgeous...You can mail this safely in a clear plastic for very little more than a padded envelope. Great tutorial.
Wow! I'm picking up my jaw from the floor. This is amazing. Amazing coloring, amazing dimension, amazingly beautiful!!!
Oh my Goodness Gravy - this is absolutely GORGEOUS!! Wow - your coloring tut is terrific and the dimension on this card is just AMAZING! Just LOVELY! Thanks so much for playin' along with us this week for the Shelly's Images "Show Us What You Got" Challenge.
We hope you'll join us again soon! Hugs & Happy Days! ~Min
Kaymin Kreations
Loretta, this card is fantastic! What a beautiful job you did in coloring it! I don't think you used too many reds on the cherries, otherwise they wouldn't look so realistically edible!
Wow, wow, wow! This is just fabulous, Loretta. The colors are so rich and deep. I have to admit I'm terrified of using dark colored copics - especially reds. Thanks for the inspiration and the tutorial. I have bookmarked it for the next time I need to do reds!
Hope you are doing well!
Blessings,
Linda
Loretta I'm just stunned girl! Yer killin me! LOL! This is just incredible. I really enjoy your work.
I'd give it a 10...picture PERFECT! That's one classy card!
I can certainly see why your card was featured on the email...it's stunning. I adore the color combo/paper you used and your tutorial is a lot of hard work and wonderful.
Wow Loretta...Amazing...This is truly a work of art!! I love cardinals and your image definitely does them justice!! Spectacular Work!! Thanks for joining us at Stamptacular Sunday Challenge this week!! I will be looking for more challenges you enter with us!!
Just Beautiful, the dimension just brings it to life, so lovely!
Absolutely stunning, Loretta. You have a gorgeous touch with the Copics. Love your puppies!
Wow from me too Loretta x A gorgeous creation and perfect for our challenge at MTTCC this week - thanks for joining us x
Fab colouring! and thanks so much for joining in our Perfect Pets challenge at My Time to Craft this week.
Chrissie
Hey Loretta! What a pretty approach to this week's Tuesday Trigger in the Moxie Fab World! I'm so glad you joined in on all the fun! :)
Post a Comment